Saturday, March 30, 2013

easter goodies...

I hope everyone is having a great Easter break wherever you may be at the moment. I am currently spending the break in PA with my family. I don't think I could ask for a more beautiful or perfect day. The sky is blue, the weather is not too cold and the Penguins are currently playing on the television. Not to mention that the ham is in the slow cooker and a delicious looking truffle my mom made is in the fridge just waiting to be devoured this afternoon. Before I left to come home for break, I decided to put together  few fun Easter baskets that were inspired by Jessica at Little Baby Garvin. I always love how she decorates and puts together the cutest holiday gifts for her man. Seriously, I always steal her ideas and don't know what I did before I started following her blog! Be prepared for some serious cuteness. 


First of all, let me talk about this "festooning" stuff that she refers to in her post. Apparently, it is available at local craft stores. It is the easiest  hardest stuff to find in real life. I literally went to Michaels, Hobby Lobby, Party City and Jo-Ann's looking for it and no one has even heard of it! Now, with that being said, you can find it here if you don't need it the day before you plan to give the gift. It's really inexpensive and super cute stuff. Now, with panic in my heart, I had to come up with a Plan B for my project. I realized that I am a pro at making little tissue paper poms/flowers, so I figured I would just cover the boxes with white tissue paper and then attach three little flowers to the front to look like bunny tails. I also decided that the man basket was cute, but could easily become a kid-friendly basket for littles. All you have to do is buy your man a six-pack of beer and your little a six-pack of soda. Voila! Easy peasy! I kept three of the drinks on one side and cut out the cardboard on the other side to make it one big open side to stuff all sorts of goodies. 


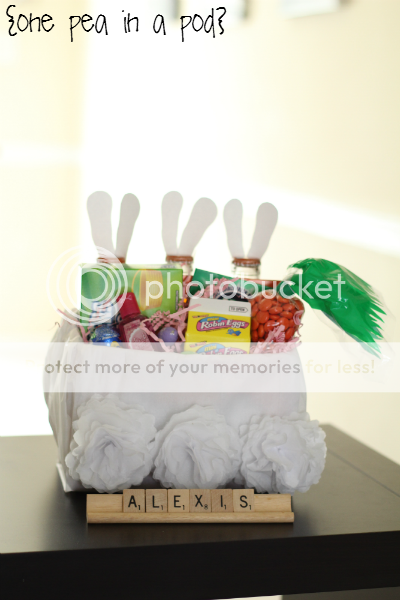
I stuffed some tissue paper in the bottom to build it up a bit and then added some pink paper shreds from the Dollar Tree. One pack will last you forever! For Lex I just added some candy (of course there are Cadbury eggs!), gum and some Bath & Body Works hand sanitizer. For my man I added some candy, gum, a small bottle of his favorite liquor Disaronno and some small notes inside the eggs.


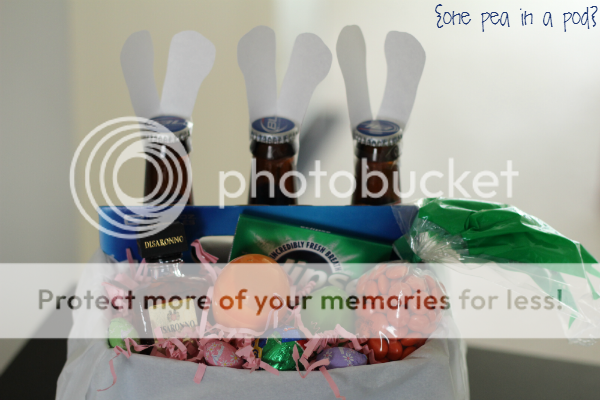
I cut out some white ears and taped them on the bottles. I kept the bottles in the fridge until I was ready to put the whole basket together. I think they turned out really well and are totally festive! Tomorrow I will do a quick post on the cute little "peeps" cups you see in the middle of the first picture. I hope you have come up with a cute Easter basket for the people in your life and are enjoying some time with your families! 


Monday, March 25, 2013

{recipe} cheesy chicken pot pie cups

So, you aren't going to believe it, but here I am blogging on ANOTHER snow day! Clearly my "Welcome Spring" chalkboard did not work its' magic today. Not that I'm complaining at all. A few weeks ago, I made these pot pie cups and I have been meaning to share the recipe with you. They are super easy to make and are great to freeze and pull out for a quick meal if needed. I normally try to buy everything low-fat for this recipe, even though the original doesn't call for it. I will tell you right now that it DOES NOT change the taste whatsoever! So, no more nonsense, let's get right to it!

Cheesy Chicken Pot Pie Cups

1. Gather all your ingredients. Pre-heat oven to 400 degrees.
{See complete list below}

2. Cook your chicken (I use a small indoor grill that cooks it up super fast!), cut up the chicken (or shred it) and measure out all of your ingredients (except the biscuits, of course).

3. Combine all ingredients in a large bowl with a spoon until thoroughly mixed. 

4. Spray a muffin tin with cooking spray. Flatten out your biscuits into large, thin circles and then press into the muffin tin to create a small cup. 
{for some reason I could only find 8 packs of biscuits}

5. Scoop chicken mixture into the cups. I used a cookie scoop to make it super easy. It took about two scoops to fill them all. 

6. Then, just pop in the oven and cook for about 12-15 minutes. Cook time will vary based on your oven. I have gas and it takes about 14 minutes to get them golden-brown and cooked. Make sure you check them often as they can turn quickly. 

7. When you are finished, they should look as delicious as this and will be quickly eaten up by anyone nearby. Serve with a salad as a side. 

Here is the full recipe:

- 1 can of reduced fat biscuits (10 count)
- 1 cup cooked chicken breast, diced

- 1 (10 1/2 ounce) can reduced-fat cream of chicken soup
- 2/3 cup shredded low-fat cheddar cheese
- 1 cup of frozen mixed veggies (I use broccoli, cauliflower, corn, peas...anything)
- 1 teaspoon dried parsley flakes
- 1 teaspoon of onion powder

- 1/4 teaspoon black pepper

1. Preheat oven to 400 degrees.
2. Separate biscuits and place each biscuit in a cup of a lightly greased 12-hole muffin pan, pressing dough up sides to edge of cup.
3. In a medium bowl, combine chicken, chicken soup, veggies, cheddar cheese, onion powder, parsley flakes, and black pepper. Mix well to combine.
4. Evenly spoon chicken mixture into prepared biscuit cups.
5. Bake for 12 to 15 minutes or until golden brown.
6. Remove from oven. Place muffin pan on a wire rack and let set for 2-3 minutes. Serve at once.

Hope you enjoy this lovely little recipe! Happy snow day Monday!


Monday, March 18, 2013

{project} diy chevron wall art


So, I happened to have the day off today due to a snow storm. What?!?!?! Yes, you did read right, we had some snow/ice/sleet and everything in between roll in overnight. I was disappointed excited to get the call from robo-woman. Especially when the day started out with a one-hour delay! What better time than to work on a DIY project. Of course, I just had to share it with you in case you want to attempt this extremely cute project for yourself.  I now present to you the tutorial for your very own chevron initial wall art. 

Right now I am totally obsessed with anything and everything chevron. I love the look and I love it in practically any color. First, you need to gather a few supplies for the project.

Supplies:
-blank canvas (you can use any size, mine was an 8 x 10)
-wooden letter (again, you can use any size or thickness)
-paint (I used some wall paint I had laying around)
-fabric (I used scrap fabric, you don't need a lot)
-painter's tape (I used 2" wide)
-foam paint brushes
-chevron pattern
-mod podge
-small nails
-ruler

{I made my own pattern, but I ended up changing it from the one picture here to a small pattern because it just didn't fit the canvas right. You might have to play around as well!}

After you make a pattern for your chevron print you are going to engage in the most time consuming and meticulous part of the project: taping out the design. I really wish I could tell you there was an easy way to do this, but there just isn't. Be prepared for this to make you angry furious at times and if you are OCD, then this may be a showstopper. 

{I honestly can't even tell you how I figured out the spacing in between. I think I just kept at it until it looked equal. If at first you don't succeed, remember, it's just tape, it comes off!}

Next, you are going to need to paint the white space on the canvas. This is where you get to be creative and decide what color you want to use. I knew the fabric I was going to use for the flower, so I used that for my color palette and decided on a light gray.  Since I didn't have gray on hand, I got creative and used some wall paint I had laying around from various other projects.  I poured more white in the bucket and then added the black until it reached the shade of gray I wanted!

{Thanks mom for the bucket!}

{Make sure your tape is down tight and then paint away!}

I put two coats of gray on the canvas and let it dry completely. While the canvas dried, I took my letter which was already painted black and touched it up with a fresh coat of black paint.  Once the paint is dry, you can carefully take off the painter's tape (and cross your fingers that you had it down tight enough that the paint didn't leak through!)

{Now it isn't perfect, but that one bad spot to the left would be covered by the flower later!}

To put the letter on, it all depends on the thickness. My letter was about a 1/2" thick, so it needed some extra help staying on the canvas. First, I prepped the back of the letter by applying a layer of Mod Podge and then centering it on the canvas. I gave it a few minutes to dry while I broke out my hammer and some very tiny nails. I basically turned the canvas over and put about 5 small nails into the back of the letter to give it a little more stability for when it all dried. No one wants a falling letter in the middle of the day/night. 

Lastly, you'll need to make the cute little fabric flower. Again, I love that you can totally choose your fabric based on what colors you are using. I had some scrap fabric from another project I completed and I just used that. I found the tutorial for this flower here if you get lost and want better pictures/instructions. She also has some other really cool flower tutorials that I can't wait to try!

Start by cutting out about 11 or 12 circles that are about 2" in diameter. I used a small juice glass to trace my circles and it was about 2 1/2" in diameter. You should probably watch t.v. or put on some music while you cut out all the circles or you may go insane. Don't say I didn't  warn you!


You are going to use one of the circles as the base for your flower. Place it with the printed side up. Then, you will need to create the petals. You do this by taking a flower and folding it half and then in half again, so it looks something like this...

{Always fold with the printed side up.}

To attach to the base, simply use your machine (what I used) or hand stitch the petal on to the base. 


Make another petal and place it next to the first one, overlapping just a little bit and then stitch again. I was able to get about 6 petals for the first layer. Then, start a new layer on top of the first layer. This time, I only sewed on 4 to create the top of the flower. Once it is all sewed, just fluff it up and you are done! 

{These flowers are also great to attach to clips or headbands!}

Finally, it's time to put the finishing touch on the chevron art. I used some little tiny white brads to attach the flower to the canvas. These poked through the fabric and canvas nicely and weren't noticeable at all. I'm sure if you don't have those you could just hot glue it on to the canvas and it would be just fine. That's it! Hang up your chevron wall art and admire it! 


Well, I'm off to enjoy the rest of my snow day! Have a great afternoon!


Saturday, March 16, 2013

life is what happens...


...when we're busy making other plans. This just so happens to be one of my favorite quotes EVER! Fortunately, I make sure that this is never the case in my life. So, what does this mean exactly.........I went MIA for a while. I do apologize, but it has been a busy couple of weeks and I truly have wanted to blog, but something always came up. Well, I'm back and here to report on all the latest and greatest happenings. 

One of which was my birthday. I turned twenty-one twenty-eight this year. Something about writing your age out in words makes it look so much better than using numbers. My family decided to come visit me for the weekend and boy was it filled with love, laughs and projects! If you know me, then you will know that no project ever goes as easy as I think it will. A 30 minute project can quickly turn into a 3 hour project, to say the least. This is normally accompanied by a splitting headache, loss of sanity and a need for a cold beverage. This was the case when we decided to change out my broken blinds on the sliding glass doors in the basement. Now, the "blinds" weren't technically broken, just that long, little turny thing on the end that moves the blinds was broken (thank you cheap plastic manufacturers). My wonderful co-worker was moving and had an extra set of blinds that she gave me, so I will forever be grateful to her for saving me some big bucks down the road. Thanks L.C.! Now, the project should have been easy. Just snap the old blinds off and snap the new set on. WRONG! Nothing was lining up right even though everything measured out the same. To make matters worse, it seemed like everything we took down was worse off in the end than when we started. I wanted to cry. To make a long story short, after several different attempts to solve the problem, we did eventually find a way to get the blinds snapped on and they look fine. What an adventure, to way the least.

Finally, we got around to making my birthday dinner. I am a big fan of just staying in and having a home cooked meal. I thought the table looked perfect!


Please tell me your mouth isn't watering over this deliciousness right now!


Later that night, we celebrated my birthday with an amazing orange flavored cake with orange flavored icing. I love the simplicity!


After opening presents, we watched Taken 2 (yes, it was my 2nd time, but I love Liam Neeson!) I had such a wonderful weekend with my family and always hate to see them go. I can't believe that my brother had not been down to visit in over a year. What a crime! There are some super funny outtakes from the weekend that I will post later this week, so stay tuned. Until then, I'll leave you with a picture of me and my momma! Love her to death!


Have a great Saturday! 


Sunday, March 3, 2013

good things come in small packages...

So, this weekend was certainly filled with fun, friends and lots of photography! First up was moving day for a co-worker early Saturday morning. And this wasn't even a problem because I can't even sleep in on the weekends when I want to. It is near impossible. I know, hard to believe. The morning was filled with moving/unpacking fun with a whole slew of my favorite teacher friends. There was a lot of laughs, a lot of measuring and one cute little girl. I mean, seriously folks, she is a magnet for the camera. I honestly could take pictures of her all day long. There were some truly priceless moments captured on film that day, which is why I love working behind the lens so much. Now, you would think that I would go home and take long nap after all that morning fun, right? Oh no, I decided to take a road trip to the outlet mall and do some shopping for none other than myself my camera! 

{the most dangerous place on earth}

I'm sure there isn't a person around who doesn't at least know the name Vera Bradley. I have to admit, I had a slight obsession for a while a few years back. I staged my own intervention and was able to go over a year without purchasing a single Vera Bradley item (cue back pat now). With the recent purchase of my camera, I just knew I needed something more than your standard black bulky camera bag. Of course, I knew right away where I needed to go: The Vera Bradley Outlet. Luckily I had just received my birthday surprise in the mail earlier in the week and they were running an extra 40% sale on Saturday! Drum roll please.........


This beauty is my new camera bag! I am so in love with it! It must have a dozen pockets to place SD cards, batteries, chargers, all my lenses, etc. I also like that one of the outer flaps has great storage for my phone and other essentials so I won't have to take a purse with me for shoots. But the most amazing part of the bag is the shoulder strap for sure. I love that truly feels like a camera bag, without being so ugly plain. The print is Tea Garden and is retired, but the style of the bag is available in most current patterns. Definitely a must have in my book. 

The best part of the day came after the outlet shopping. It was time to purchase my first extra lens for my camera! I ran over to the Best Buy in the area and scored myself a new lens that will be perfect for portraits. 


I have been wanting this lens primarily for the f-stop range. It certainly delivers. The picture above was taken using the new lens, so you can see how wonderful the pictures turn out. I can't wait to take more pictures and see what all this little guy can do. It was certainly like Christmas putting this lens on last night and experimenting with it. I'm also trying to get my photography blog up and running in the near future to try and grow this hobby into something more. Keep posted for further information on that soon. 

Well, after an exciting weekend, my Sunday has been filled with church, editing and relaxing for the most part. I can't wait to see what the new week brings. Have a great start of the work week everyone!