
So, I happened to have the day off today due to a snow storm. What?!?!?! Yes, you did read right, we had some snow/ice/sleet and everything in between roll in overnight. I was disappointed excited to get the call from robo-woman. Especially when the day started out with a one-hour delay! What better time than to work on a DIY project. Of course, I just had to share it with you in case you want to attempt this extremely cute project for yourself. I now present to you the tutorial for your very own chevron initial wall art.
Right now I am totally obsessed with anything and everything chevron. I love the look and I love it in practically any color. First, you need to gather a few supplies for the project.
Supplies:
-blank canvas (you can use any size, mine was an 8 x 10)
-wooden letter (again, you can use any size or thickness)
-paint (I used some wall paint I had laying around)
-fabric (I used scrap fabric, you don't need a lot)
-painter's tape (I used 2" wide)
-foam paint brushes
-chevron pattern
-mod podge
-small nails
-ruler
{I made my own pattern, but I ended up changing it from the one picture here to a small pattern because it just didn't fit the canvas right. You might have to play around as well!}
After you make a pattern for your chevron print you are going to engage in the most time consuming and meticulous part of the project: taping out the design. I really wish I could tell you there was an easy way to do this, but there just isn't. Be prepared for this to make you angry furious at times and if you are OCD, then this may be a showstopper.
{I honestly can't even tell you how I figured out the spacing in between. I think I just kept at it until it looked equal. If at first you don't succeed, remember, it's just tape, it comes off!}
Next, you are going to need to paint the white space on the canvas. This is where you get to be creative and decide what color you want to use. I knew the fabric I was going to use for the flower, so I used that for my color palette and decided on a light gray. Since I didn't have gray on hand, I got creative and used some wall paint I had laying around from various other projects. I poured more white in the bucket and then added the black until it reached the shade of gray I wanted!
{Thanks mom for the bucket!}
{Make sure your tape is down tight and then paint away!}
I put two coats of gray on the canvas and let it dry completely. While the canvas dried, I took my letter which was already painted black and touched it up with a fresh coat of black paint. Once the paint is dry, you can carefully take off the painter's tape (and cross your fingers that you had it down tight enough that the paint didn't leak through!)
{Now it isn't perfect, but that one bad spot to the left would be covered by the flower later!}
To put the letter on, it all depends on the thickness. My letter was about a 1/2" thick, so it needed some extra help staying on the canvas. First, I prepped the back of the letter by applying a layer of Mod Podge and then centering it on the canvas. I gave it a few minutes to dry while I broke out my hammer and some very tiny nails. I basically turned the canvas over and put about 5 small nails into the back of the letter to give it a little more stability for when it all dried. No one wants a falling letter in the middle of the day/night.
Lastly, you'll need to make the cute little fabric flower. Again, I love that you can totally choose your fabric based on what colors you are using. I had some scrap fabric from another project I completed and I just used that. I found the tutorial for this flower here if you get lost and want better pictures/instructions. She also has some other really cool flower tutorials that I can't wait to try!
Start by cutting out about 11 or 12 circles that are about 2" in diameter. I used a small juice glass to trace my circles and it was about 2 1/2" in diameter. You should probably watch t.v. or put on some music while you cut out all the circles or you may go insane. Don't say I didn't warn you!

You are going to use one of the circles as the base for your flower. Place it with the printed side up. Then, you will need to create the petals. You do this by taking a flower and folding it half and then in half again, so it looks something like this...
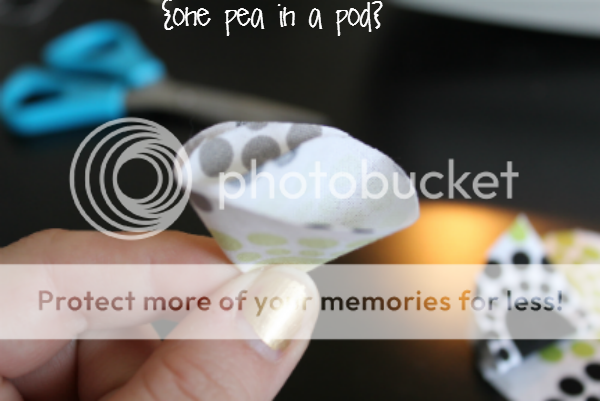
{Always fold with the printed side up.}
To attach to the base, simply use your machine (what I used) or hand stitch the petal on to the base.

Make another petal and place it next to the first one, overlapping just a little bit and then stitch again. I was able to get about 6 petals for the first layer. Then, start a new layer on top of the first layer. This time, I only sewed on 4 to create the top of the flower. Once it is all sewed, just fluff it up and you are done!

{These flowers are also great to attach to clips or headbands!}
Finally, it's time to put the finishing touch on the chevron art. I used some little tiny white brads to attach the flower to the canvas. These poked through the fabric and canvas nicely and weren't noticeable at all. I'm sure if you don't have those you could just hot glue it on to the canvas and it would be just fine. That's it! Hang up your chevron wall art and admire it!
Well, I'm off to enjoy the rest of my snow day! Have a great afternoon!
No comments:
Post a Comment